使用 ASP.NET Core 的交互式应用程序
注解
对于任何先决条件(例如模板),请先查看 overview。
在本快速入门中,我们希望通过 OpenID Connect 协议向我们在上一章中构建的 IdentityServer 添加对交互式用户身份验证的支持。
一旦到位,我们将创建一个 MVC 应用程序,该应用程序将使用 IdentityServer 进行身份验证。
添加用户界面
OpenID Connect 所需的所有协议支持都已内置到 IdentityServer 中。 您需要为登录、注销、同意和错误提供必要的 UI 部分。
虽然每个 IdentityServer 实现的外观和感觉以及确切的工作流程可能总是有所不同,但我们提供了一个基于 MVC 的示例 UI,您可以将其用作起点。
这个 UI 可以在 Quickstart UI 仓库 中找到。 您可以克隆或下载此存储库并将控制器、视图、模型和 CSS 放入您的 IdentityServer Web 应用程序中。
或者,您可以使用 .NET CLI(从 src/IdentityServer 文件夹中运行):
dotnet new is4ui
添加 MVC UI 后,您还需要在 DI 系统和管道中启用 MVC。
当您查看 Startup.cs 时,您会发现 ConfigureServices 和 Configure 方法中的注释告诉您如何启用 MVC。
注解
还有一个名为 is4inmem 的模板,它结合了包括标准 UI 在内的基本 IdentityServer。
运行 IdentityServer 应用程序,您现在应该会看到一个主页。
花一些时间检查控制器和模型 —— 特别是 AccountController ,它是主要的 UI 入口点。
您对它们理解得越好,将来进行修改就越容易。
大多数代码使用“功能文件夹”样式位于 “Quickstart” 文件夹中。
如果这种风格不适合您,请随意以您想要的任何方式组织代码。
创建 MVC 客户端
接下来,您将创建一个 MVC 应用程序。 为此使用 ASP.NET Core “Web 应用程序”(即 MVC)模板。
从 src 文件夹运行:
dotnet new mvc -n MvcClient
cd ..
dotnet sln add .\src\MvcClient\MvcClient.csproj
注解
我们建议通过 IIS Express 使用自托管选项。 其余文档假设您在端口 5002 上使用自托管。
要向 MVC 应用程序添加对 OpenID Connect 身份验证的支持,您首先需要将包含 OpenID Connect 处理程序的 nuget 包添加到您的项目中,例如:
dotnet add package Microsoft.AspNetCore.Authentication.OpenIdConnect
..然后将以下内容添加到 Startup 中的 ConfigureServices
using System.IdentityModel.Tokens.Jwt;

// ...

JwtSecurityTokenHandler.DefaultMapInboundClaims = false;

services.AddAuthentication(options =>
    {
        options.DefaultScheme = "Cookies";
        options.DefaultChallengeScheme = "oidc";
    })
    .AddCookie("Cookies")
    .AddOpenIdConnect("oidc", options =>
    {
        options.Authority = "https://localhost:5001";

        options.ClientId = "mvc";
        options.ClientSecret = "secret";
        options.ResponseType = "code";

        options.SaveTokens = true;
    });
AddAuthentication 将身份验证服务添加到 DI。
我们使用 cookie 在本地登录用户(通过 "Cookies" 作为 DefaultScheme),
我们将 DefaultChallengeScheme 设置为 oidc,因为当我们需要 用户登录,我们将使用 OpenID Connect 协议。
然后我们使用 AddCookie 来添加可以处理 cookie 的处理程序。
最后,AddOpenIdConnect 用于配置执行 OpenID Connect 协议的处理程序。
Authority 指示可信令牌服务所在的位置。
然后我们通过 ClientId 和 ClientSecret 来识别这个客户端。
SaveTokens 用于将来自 IdentityServer 的令牌持久保存在 cookie 中(因为稍后将需要它们)。
注解
我们使用所谓的 授权码(authorization code) 流程与 PKCE 连接到 OpenID Connect 提供程序。 有关协议流的更多信息,请参见 这里。
然后为了确保在每个请求上执行身份验证服务,将 UseAuthentication 添加到 Startup 中的 Configure
app.UseStaticFiles();

app.UseRouting();
app.UseAuthentication();
app.UseAuthorization();

app.UseEndpoints(endpoints =>
{
    endpoints.MapDefaultControllerRoute()
        .RequireAuthorization();
});
注解
RequireAuthorization 方法禁用对整个应用程序的匿名访问。
如果您想在每个控制器或操作方法的基础上指定授权,您还可以使用 [Authorize] 属性。
还要修改主页视图以显示用户的声明以及 cookie 属性:
@using Microsoft.AspNetCore.Authentication

<h2>Claims</h2>

<dl>
    @foreach (var claim in User.Claims)
    {
        <dt>@claim.Type</dt>
        <dd>@claim.Value</dd>
    }
</dl>

<h2>Properties</h2>

<dl>
    @foreach (var prop in (await Context.AuthenticateAsync()).Properties.Items)
    {
        <dt>@prop.Key</dt>
        <dd>@prop.Value</dd>
    }
</dl>
如果您现在使用浏览器导航到应用程序,则会尝试重定向到 IdentityServer —— 这将导致错误,因为 MVC 客户端尚未注册。
添加对 OpenID Connect 身份范围的支持
与 OAuth 2.0 类似,OpenID Connect 也使用范围(scopes)概念。 同样,范围代表您想要保护和客户端想要访问的东西。 与 OAuth 相比,OIDC 中的范围不代表 API,而是代表用户 ID、姓名或电子邮件地址等身份数据。
通过修改 Config.cs 中的 IdentityResources 属性,添加对标准 openid (subject id)和 profile (名字、姓氏等)范围的支持:
public static IEnumerable<IdentityResource> IdentityResources =>
    new List<IdentityResource>
    {
        new IdentityResources.OpenId(),
        new IdentityResources.Profile(),
    };
在 startup.cs 中向 IdentityServer 注册身份资源:
var builder = services.AddIdentityServer()
    .AddInMemoryIdentityResources(Config.IdentityResources)
    .AddInMemoryApiScopes(Config.ApiScopes)
    .AddInMemoryClients(Config.Clients);
注解
所有标准范围及其相应的声明都可以在 OpenID Connect 规范 中找到。
添加测试用户
示例 UI 还带有一个内存中的“用户数据库”。 您可以通过添加 AddTestUsers 扩展方法在 IdentityServer 中启用此功能:
var builder = services.AddIdentityServer()
    .AddInMemoryIdentityResources(Config.IdentityResources)
    .AddInMemoryApiScopes(Config.ApiScopes)
    .AddInMemoryClients(Config.Clients)
    .AddTestUsers(TestUsers.Users);
当您导航到 TestUsers 类时,您可以看到定义了两个名为 alice 和 bob 的用户以及一些身份声明。
您可以使用这些用户登录。
将 MVC 客户端添加到 IdentityServer 配置
最后一步是将 MVC 客户端的新配置条目添加到 IdentityServer。
基于 OpenID Connect 的客户端与我们目前添加的 OAuth 2.0 客户端非常相似。 但由于 OIDC 中的流程始终是交互式的,我们需要在配置中添加一些重定向 URL。
客户端列表应如下所示:
public static IEnumerable<Client> Clients =>
    new List<Client>
    {
        // 机器到机器客户端(来自快速入门 1 开始)
        new Client
        {
            ClientId = "client",
            ClientSecrets = { new Secret("secret".Sha256()) },

            AllowedGrantTypes = GrantTypes.ClientCredentials,
            // 客户端有权访问的范围
            AllowedScopes = { "api1" }
        },
        // 交互式 ASP.NET Core MVC 客户端
        new Client
        {
            ClientId = "mvc",
            ClientSecrets = { new Secret("secret".Sha256()) },

            AllowedGrantTypes = GrantTypes.Code,

            // 登录后重定向到哪里
            RedirectUris = { "https://localhost:5002/signin-oidc" },

            // 注销后重定向到哪里
            PostLogoutRedirectUris = { "https://localhost:5002/signout-callback-oidc" },

            AllowedScopes = new List<string>
            {
                IdentityServerConstants.StandardScopes.OpenId,
                IdentityServerConstants.StandardScopes.Profile
            }
        }
    };
测试客户端
现在,新的 MVC 客户端的一切都应该就绪了。
通过导航到受保护的控制器操作来触发身份验证握手。 您应该会看到重定向到 IdentityServer 的登录页面。
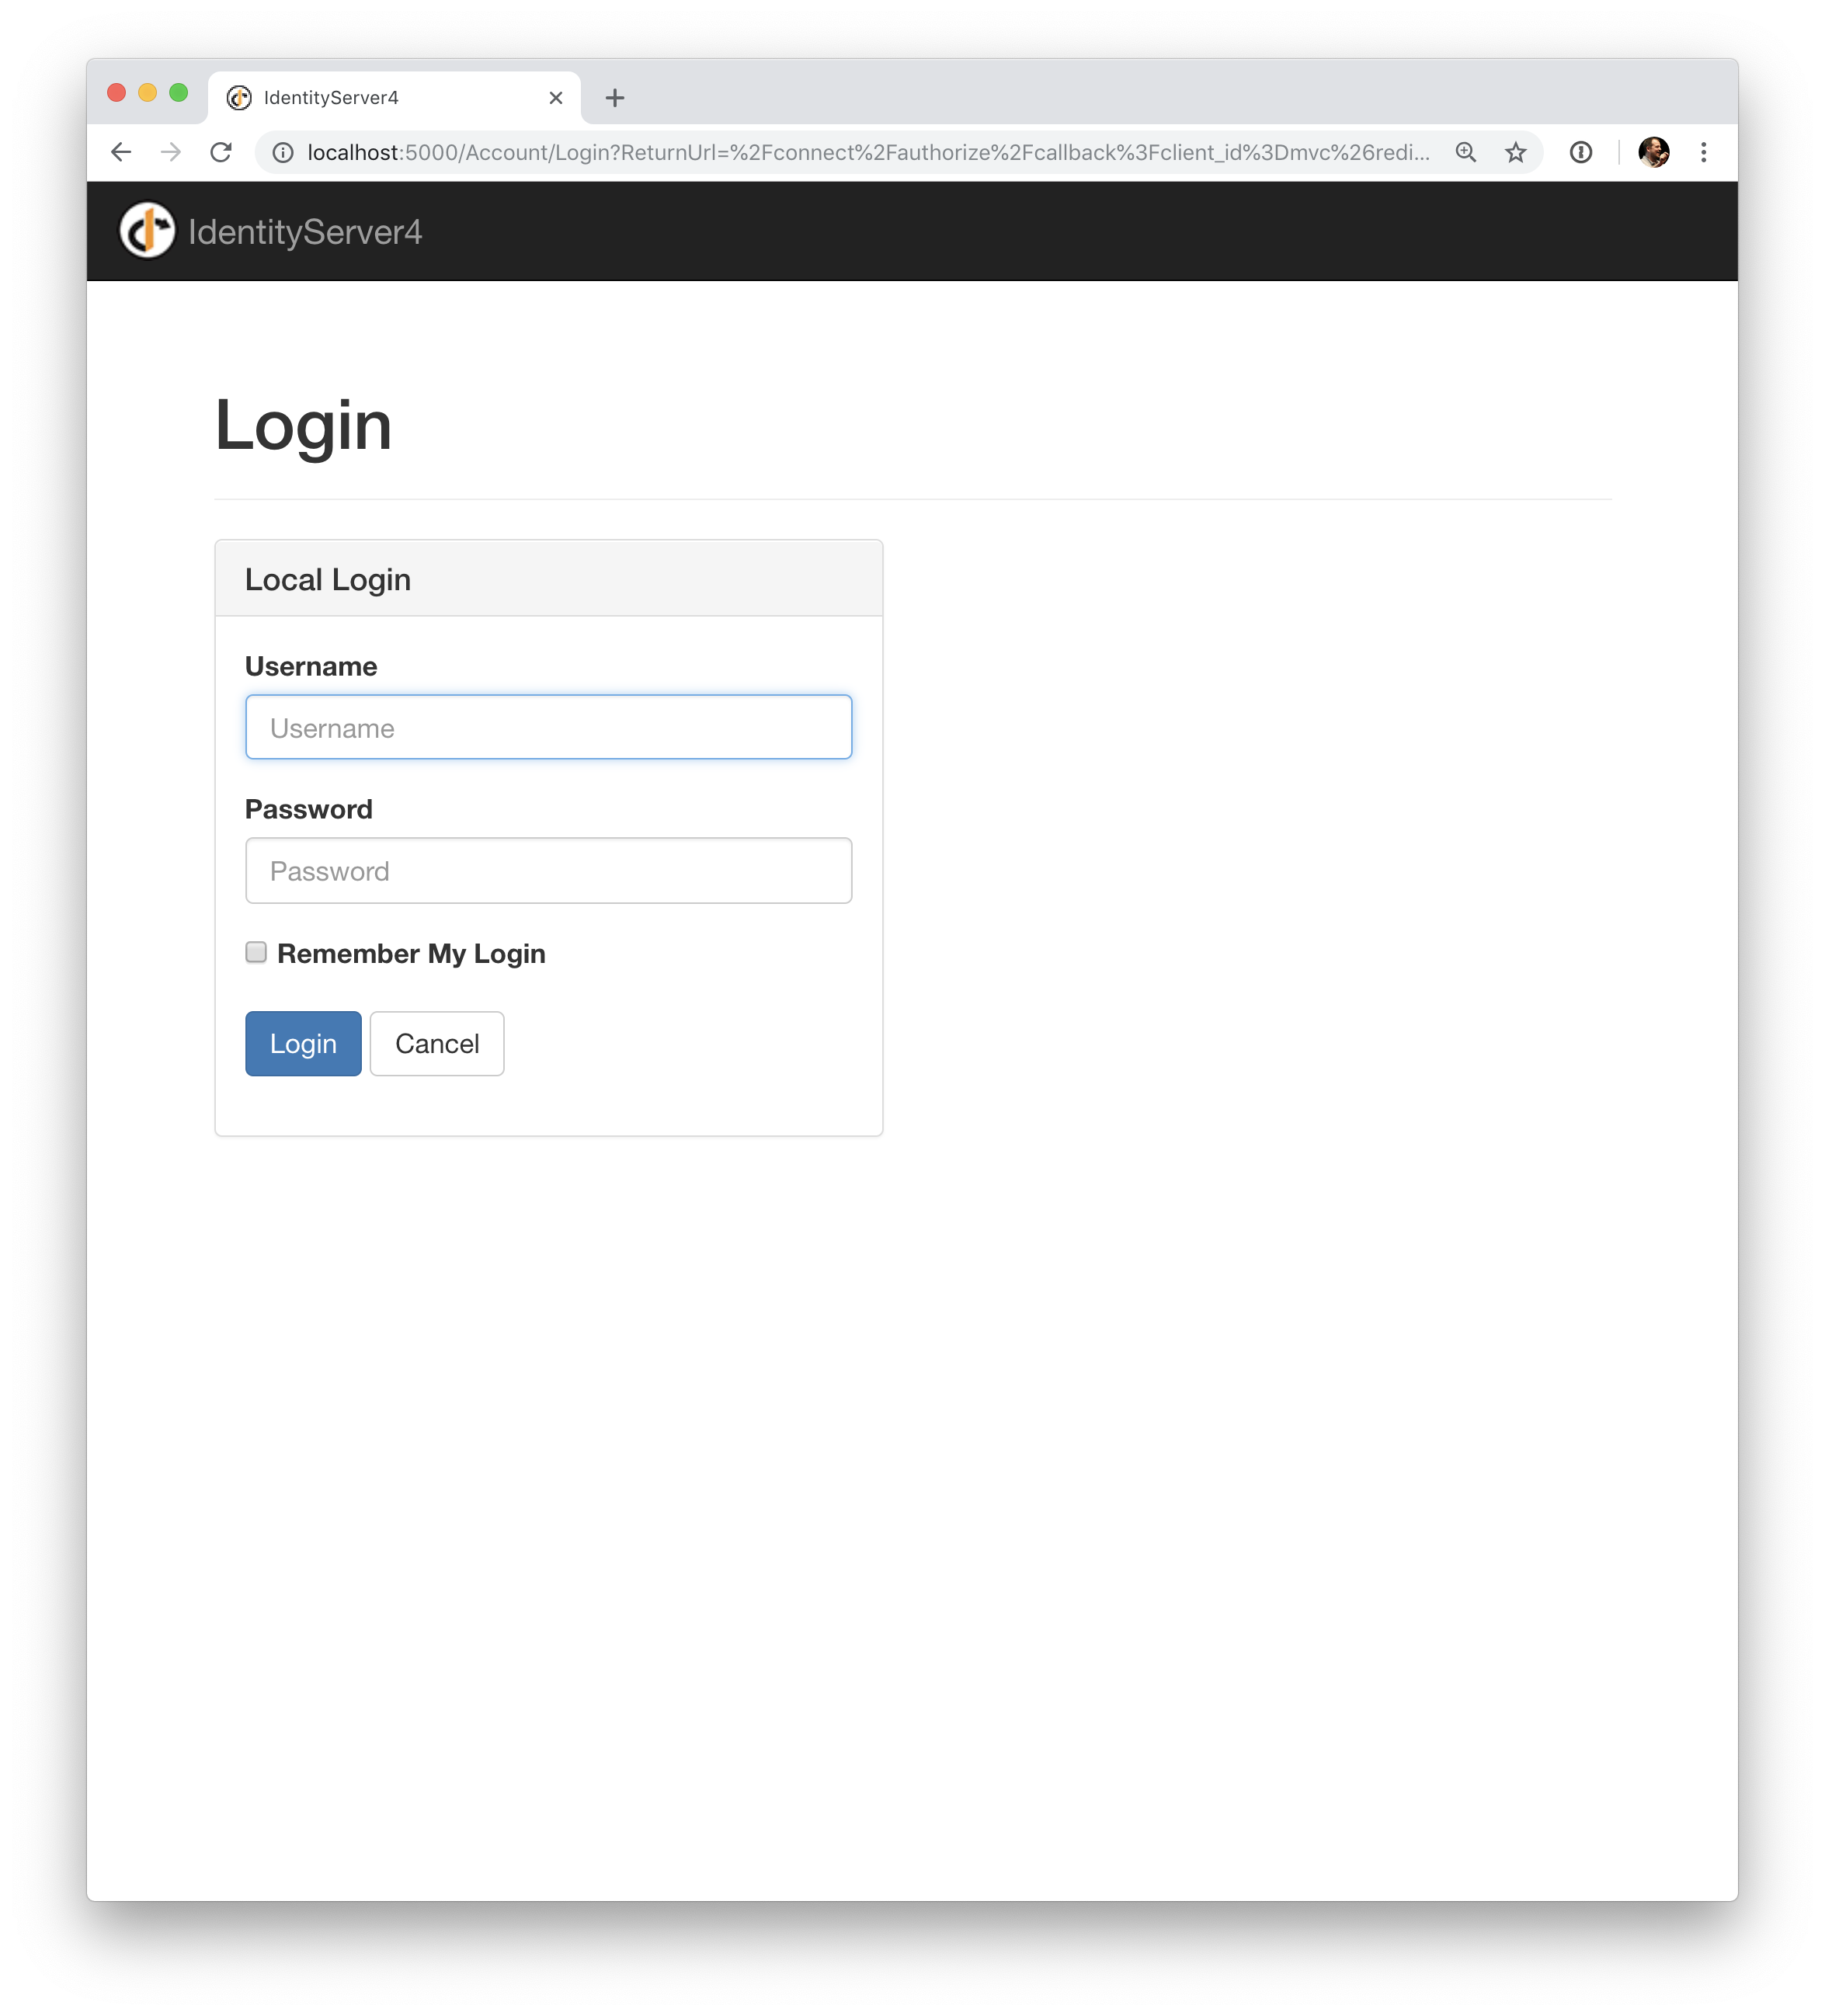
之后,IdentityServer 将重定向回 MVC 客户端,在那里 OpenID Connect 身份验证处理程序处理响应,并通过设置 cookie 在本地登录用户。 最后,MVC 视图将显示 cookie 的内容。
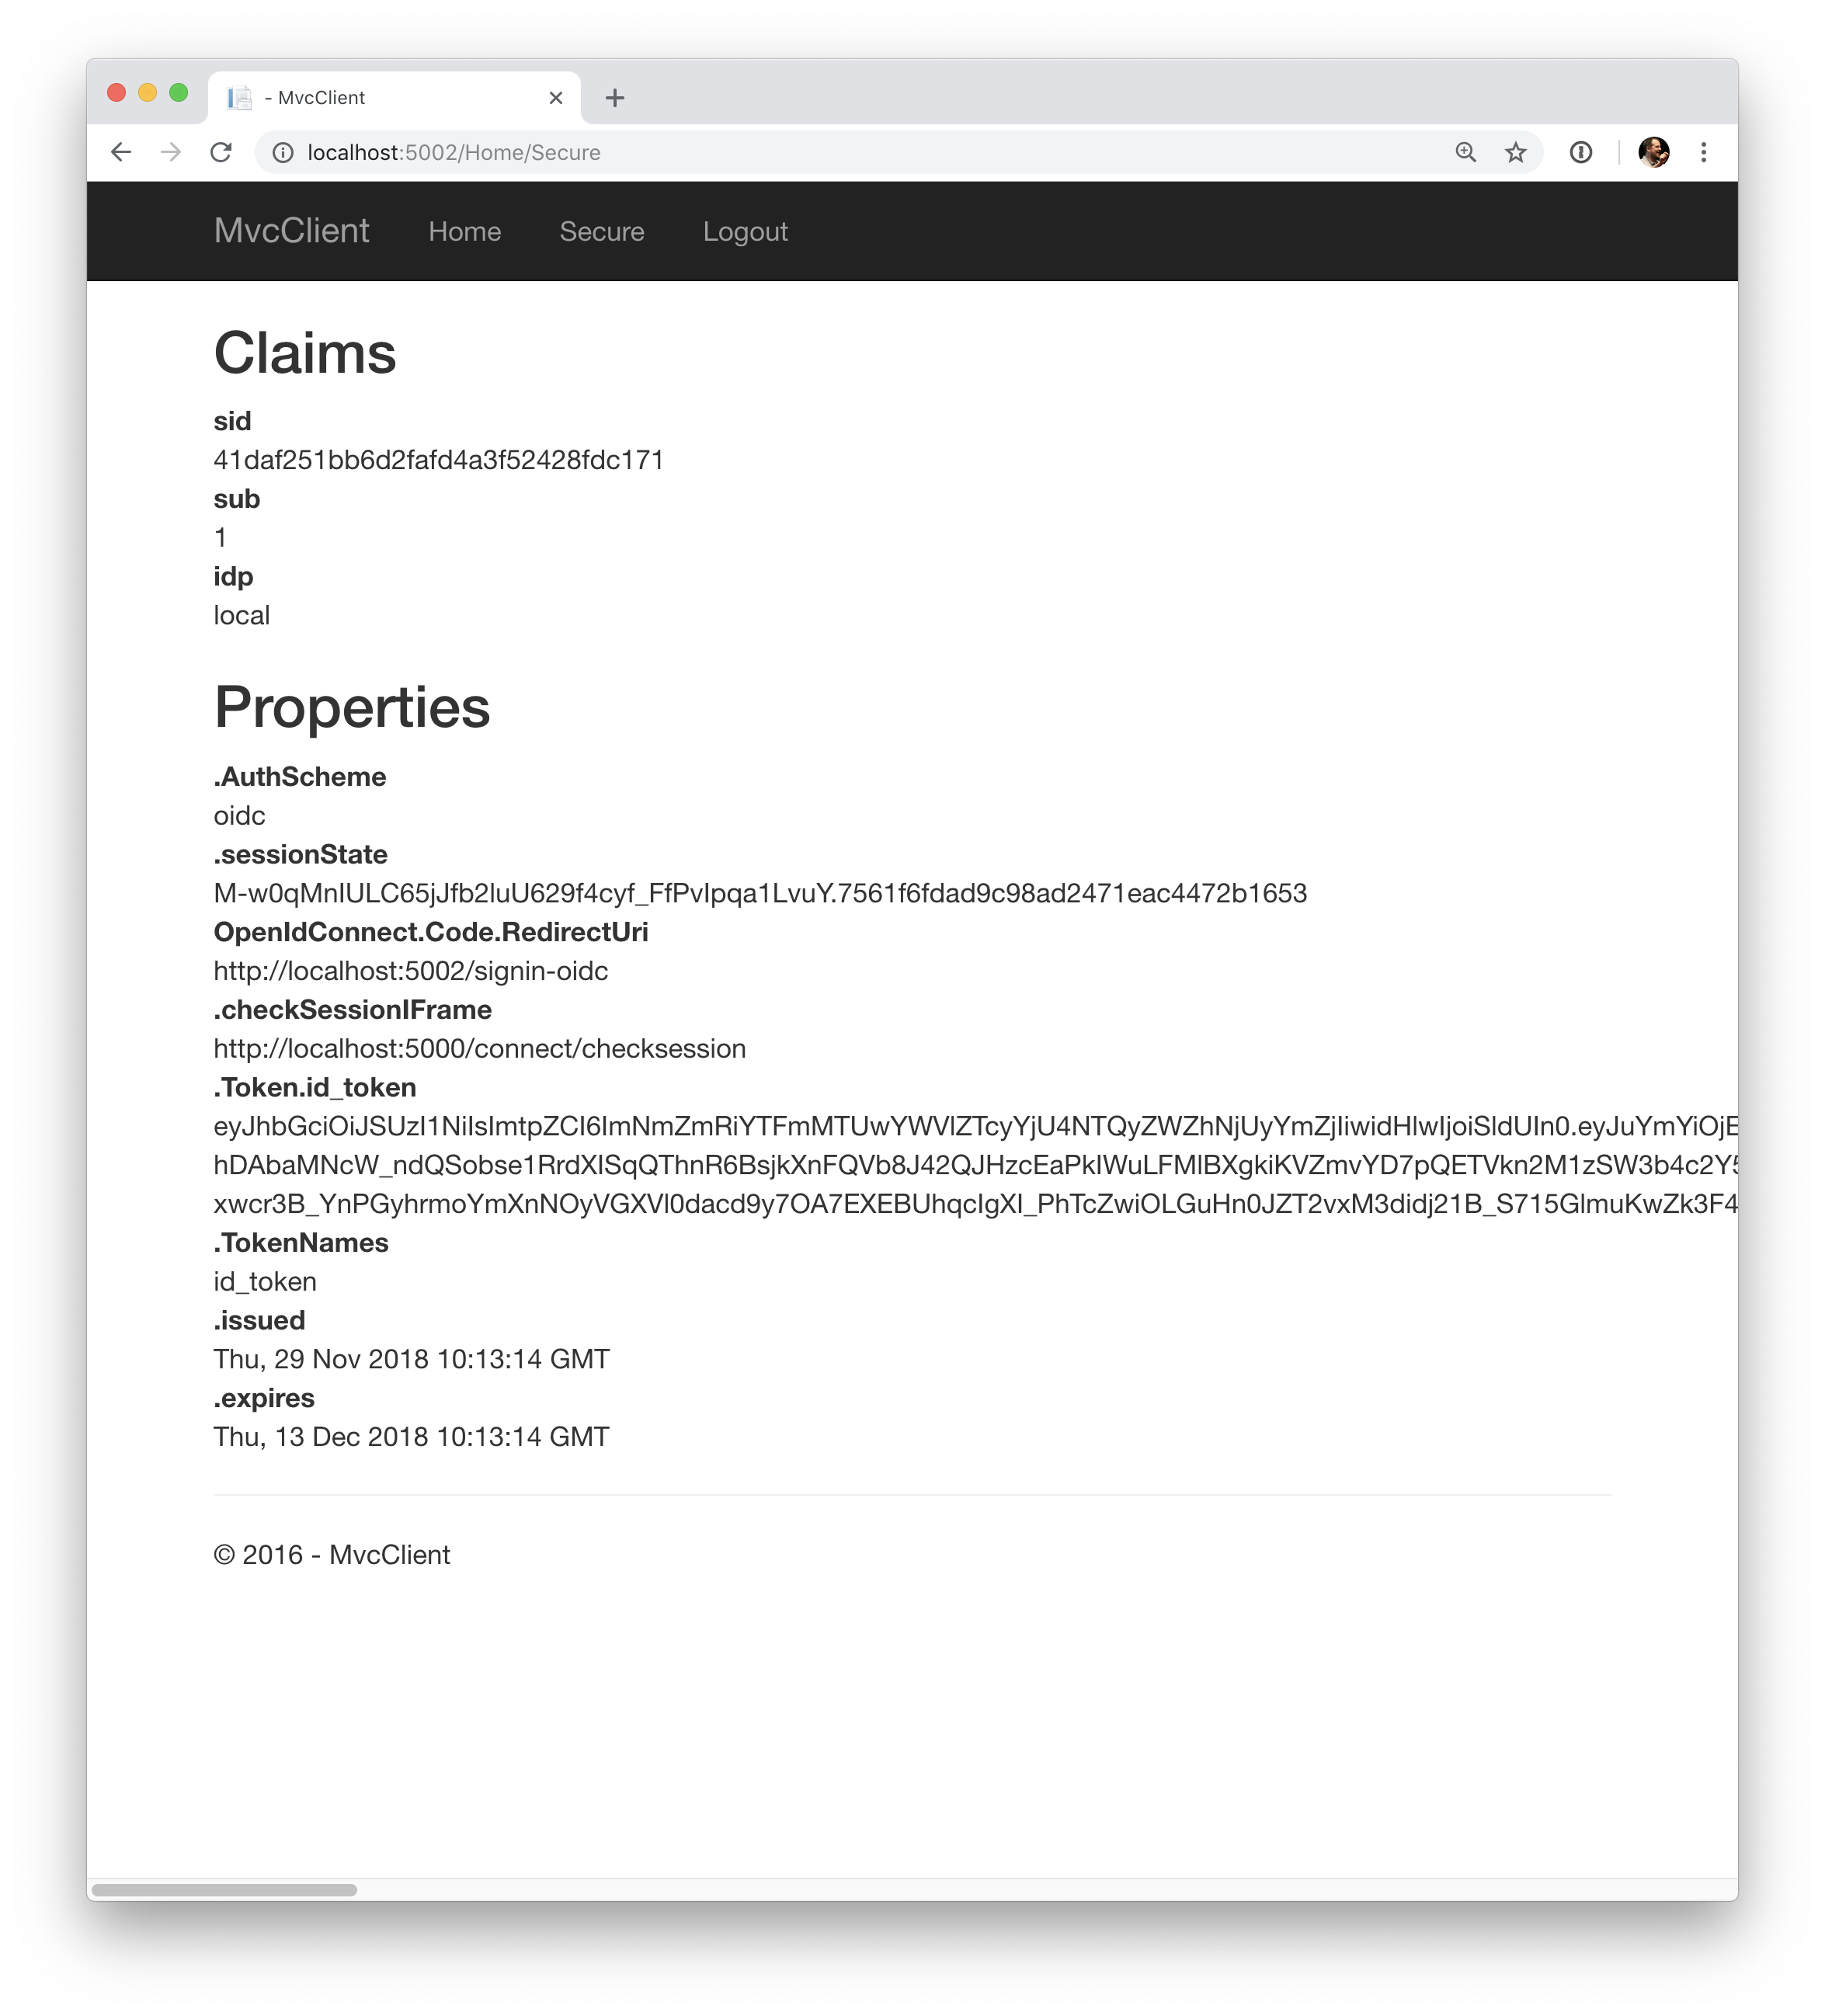
如您所见,cookie 有两部分,用户的声明和一些元数据。 此元数据还包含 IdentityServer 发布的原始令牌。 随意将此令牌复制到 jwt.ms 以检查其内容。
添加注销
最后一步是向 MVC 客户端添加注销。
使用 IdentityServer 这样的身份验证服务,仅清除本地应用程序 cookie 是不够的。 此外,您还需要往返 IdentityServer 以清除中央单点登录会话。
确切的协议步骤在 OpenID Connect 处理程序中实现, 只需将以下代码添加到某个控制器即可触发注销:
public IActionResult Logout()
{
    return SignOut("Cookies", "oidc");
}
这将清除本地 cookie,然后重定向到 IdentityServer。 IdentityServer 将清除其 cookie,然后为用户提供一个链接以返回到 MVC 应用程序。
从 UserInfo 端点获取声明
您可能已经注意到,即使我们已将客户端配置为允许检索 profile 身份范围,与该范围关联的声明(例如 name, family_name, website 等)不会出现在返回的令牌中。
我们需要告诉客户端应用程序,通过指定需要访问的范围并设置 GetClaimsFromUserInfoEndpoint 选项,来从 UserInfo 端点中提取剩余声明。
在以下示例中,我们请求的是 profile 范围,但它可以是客户端有权访问的任何范围(或多个范围):
.AddOpenIdConnect("oidc", options =>
{
    // ...
    options.Scope.Add("profile");
    options.GetClaimsFromUserInfoEndpoint = true;
    // ...
});
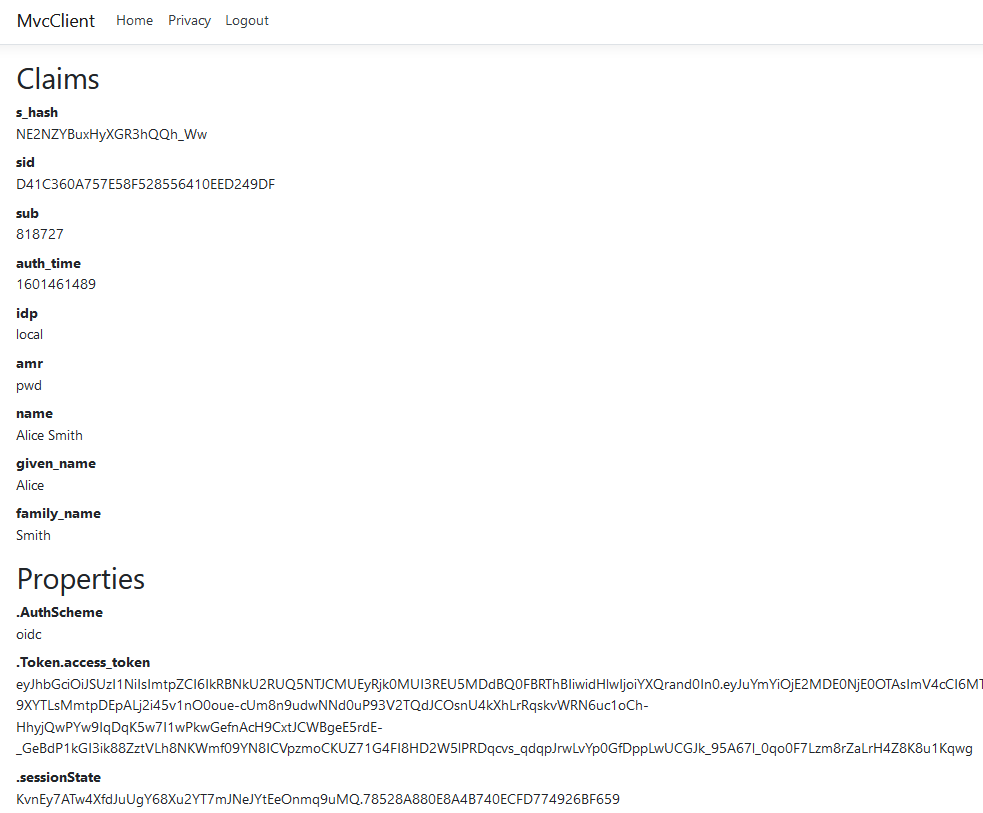
重新启动客户端应用程序、注销并重新登录后,您应该会看到与页面上显示的 profile 身份范围关联的其他用户声明。
进一步的实验
随意向测试用户添加更多声明 —— 以及更多身份资源。
定义身份资源的过程如下:
将新的身份资源添加到列表中 —— 为其命名并指定在请求此资源时应返回哪些声明
通过客户端配置上的
AllowedScopes属性让客户端访问资源通过将资源添加到客户端中 OpenID Connect 处理程序配置的
Scopes集合来请求资源(可选)如果身份资源与非标准声明(例如
myclaim1)相关联,则在客户端添加 JSON 中出现的声明(从 UserInfo 端点返回)和用户 声明 之间的 ClaimAction 映射using Microsoft.AspNetCore.Authentication // … .AddOpenIdConnect(“oidc”, options => {
// … options.ClaimActions.MapUniqueJsonKey(“myclaim1”, “myclaim1”); // …
});
同样值得注意的是,令牌声明的检索是一个扩展点 —— IProfileService。
由于我们使用的是 AddTestUsers,因此默认使用 TestUserProfileService。
您可以在 此处 检查源代码以了解其工作原理。
添加对外部身份验证的支持
接下来,我们将添加对外部身份验证的支持。 这真的很简单,因为您真正需要的只是一个与 ASP.NET Core 兼容的身份验证处理程序。
ASP.NET Core 本身支持 Google、Facebook、Twitter、Microsoft Account 和 OpenID Connect。 此外,您可以在 此处 找到许多其他身份验证提供程序的实现。
添加 Google 支持
为了能够使用 Google 进行身份验证,您首先需要向他们注册。 这是在他们的开发人员 控制台 上完成的。 创建一个新项目,启用 Google+ API ,并通过将 /signin-google 路径添加到您的基地址(例如 https://localhost:5001/signin-google)来配置您本地 IdentityServer 的回调地址。
开发者控制台将向您显示由 Google 发布的客户端ID和密码 —— 下一步你会用到的。
将 Google 身份验证处理程序添加到 IdentityServer 主机的 DI。
首先添加 Microsoft.AspNetCore.Authentication.Google nuget包,然后将此代码段添加到 Startup 中的 ConfigureServices 中:
services.AddAuthentication()
    .AddGoogle("Google", options =>
    {
        options.SignInScheme = IdentityServerConstants.ExternalCookieAuthenticationScheme;

        options.ClientId = "<在此处插入>";
        options.ClientSecret = "<在此处插入>";
    });
默认情况下,IdentityServer 专门为外部身份验证的结果配置 cookie 处理程序(使用基于常量 IdentityServerConstants.ExternalCookieAuthenticationScheme 的方案)。
Google 处理程序的配置将使用该 cookie 处理程序。
现在运行 MVC 客户端并尝试进行身份验证 —— 您将在登录页面上看到一个 Google 按钮:
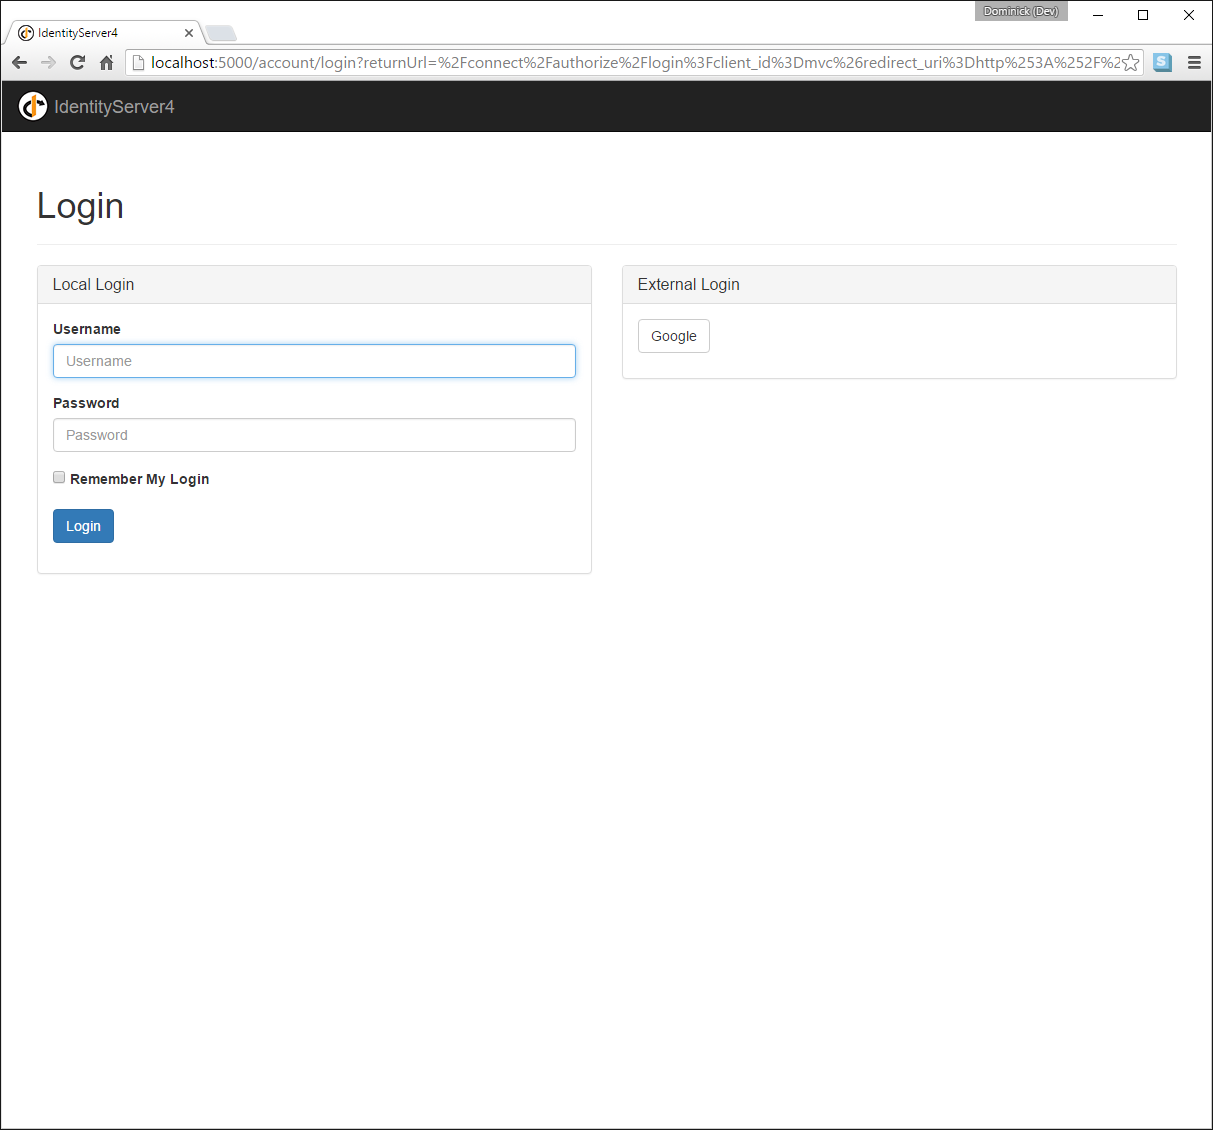
在使用MVC客户端进行身份验证之后,您可以看到这些声明现在来自 Google 数据。
注解
如果您对在登录页面上自动呈现 Google 按钮的魔法感兴趣,请检查 AccountController 上的 BuildLoginViewModel 方法。
进一步的实验
您可以添加额外的外部提供程序。 我们有一个 云托管演示 版本的 IdentityServer4,您可以使用 OpenID Connect 进行集成。
将 OpenId Connect 处理程序添加到 DI:
services.AddAuthentication()
    .AddGoogle("Google", options =>
    {
        options.SignInScheme = IdentityServerConstants.ExternalCookieAuthenticationScheme;

        options.ClientId = "<在此处插入>";
        options.ClientSecret = "<在此处插入>";
    })
    .AddOpenIdConnect("oidc", "Demo IdentityServer", options =>
    {
        options.SignInScheme = IdentityServerConstants.ExternalCookieAuthenticationScheme;
        options.SignOutScheme = IdentityServerConstants.SignoutScheme;
        options.SaveTokens = true;

        options.Authority = "https://demo.identityserver.io/";
        options.ClientId = "interactive.confidential";
        options.ClientSecret = "secret";
        options.ResponseType = "code";

        options.TokenValidationParameters = new TokenValidationParameters
        {
            NameClaimType = "name",
            RoleClaimType = "role"
        };
    });
现在,用户应该能够使用云托管的演示身份提供程序。